Ten (Or So) Steps to Take before You Ride
In This Chapter
^ Recognizing the rules of the road ^ Adjusting the handlebars and saddle ^ Checking your tire pressure, brakes, and wheels ^ Donning helmet and gloves ^ Making sure people can see you ^ Bringing your toolkit and emergency gear
ne of the themes of this book is that repair and maintenance is not just about keeping your bike in great shape and extending its life, but also making sure you stay safe. Taking a couple of minutes before you ride to prepare for your trip and to inspect your bike will go a long way in increasing the odds that you and your bike return home in one piece. In this chapter, we cover the ten (or so) top steps you can take to reduce strain on your body and improve safety while your ride.
Take a Road Safety Skills Class
The League of American Bicyclists offers road-skills classes throughout the United States to make bicyclists aware of the hazards they face sharing the roadways. The classes teach you how to avoid collisions with automobiles and dodge road hazards. You can find a class near you at www. bikeleague. org/programs/education. Contact the League of American Bicyclists at 1612 K St. NW, Suite 800, Washington, DC 20006-2850 (phone: 202-822-1333; e-mail: bikeleague@bikeleague. org; Web: www. bikeleague. org).
Adjust the Handlebars
If you’re going to be spending any amount of time on your bike, you should try to make it as comfortable an experience as possible. You can do a number of things to improve the riding experience, and one of these things is to adjust the handlebars.
For road bikes, the old-school approach to positioning the handlebars was to have the handlebar ends run parallel to the top tube in the frame. Although being bent over like the Hunchback of Notre Dame may be good for aerodynamics, having your weight supported on outstretched arms is not very comfortable for everyday riding.
|
|
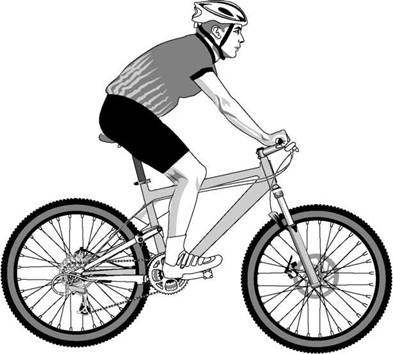
To position your handlebars for a more enjoyable ride, set them such that they leave your back at a 45-degree angle (see Figure 18-1). You may need to rotate the handlebars within the clamp that holds them or change or adjust the stem as described in Chapter 15. With the proper adjustment, you can ensure that the weight of your upper body will be distributed between your torso and your arms.
|
|
|
Figure 18-1: The proper handlebar angle. |
Another consideration for the handlebars is the position of the brake levers. You want to be able to squeeze the levers while your hands are resting comfortably on the handlebar. If you have to reach or curl your wrists to use the brakes, they aren’t positioned properly.


