Dealing with the derailleur
If the front derailleur gets hit or the chain gets stuck when you try to shift, the derailleur can become twisted or bent. If the derailleur moves out of place by twisting on the seat tube, you’ll want to move it back into place.
Follow these steps to adjust the position of the front derailleur:
1. Loosen the derailleur clamp bolt, which keeps it attached to the seat post.
Usually a 5mm Allen wrench or 8mm box wrench will do the trick.
2. Position the derailleur so that its cage is parallel with the chainrings and only 1mm above the top of the largest chainring.
3. Retighten the clamp bolt.
See Chapter 14 for more details on installing a front derailleur.
If the derailleur is bent or damaged, you’ll need to remove it and continue your ride without it. Follow these steps to remove the front derailleur:
1. Remove the screw at the back of the front derailleur cage.
2. Separate the cage and remove the chain.
3. Bypass the derailleur and place the chain on the chainring that will best serve you on your ride home.
4. Remove the clamp bolt holding the derailleur to the seat tube, disconnect the shift wire, and detach the derailleur from the bike.
You’ll need to move the shift wire into a position out of the way or completely remove it.
Like the chain, the rear derailleur is a very exposed part of the bike. It sticks out and has very little protection. If you brush up against or hit something while you’re riding, you can easily bend or damage it. A bent rear derailleur frequently is the result of a bike that falls over on that side.
|
|
Most mountain bikes use a replaceable derailleur hanger that is designed to fail before the expensive derailleur itself would. In this case, buy your bike’s replacement hanger, and keep it with you when you ride.
|
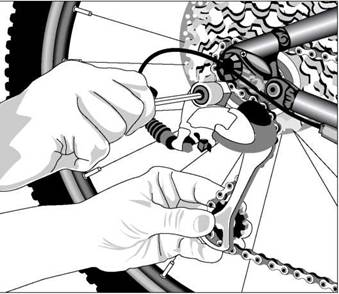
Figure 4-4: Unbending a bent rear derailleur.
|
Although modern rear derailleurs are precise instruments that are sensitive to the slightest adjustments, if you’re in a jam and a bent rear derailleur is causing your from finishing your trip, you can try manually bending it back into place. You can do this by inserting an Allen wrench into the mounting bolt and pulling upward while you pull the S-shaped cage away from the bike using your other hand, as shown in Figure 4-4.
|
|
If you straightened out the rear derailleur enough to ride home, you may want to take it to your local bike shop to be properly tuned. Bike mechanics use a special rear derailleur hanger alignment tool to properly position the derailleur.
If the rear derailleur is damaged beyond repair and won’t shift or allow you to continue biking, you’ll need to bypass the derailleur and turn your bike into a single speed. If this happens to you, follow these steps to get back on the road:
1. Use a chain tool to separate the chain.
See Chapter 10 for more information on separating and reconnecting a chain.
2. Decide on a gear that is appropriate for your ride home.
We recommend that you pick the middle chainring on triple-chainring bikes or the smallest chainring on two-chainring bikes and the middle cog in the cassette. Leave the rear derailleur on the bicycle.
3. Hold the chain together to determine if there is any overlap in the two ends.
If there is, you’ll need to remove some links in order to keep enough tension on the chain.
4. After removing the additional links, reconnect the chain.
Spin the cranks a few times to be sure that there is enough tension on the chain and that it won’t come off the chainring. If it doesn’t, you should be good enough to finish your journey.
If a cable is old, worn, or frayed there is a chance one may break while you’re riding. If it’s a cable for the derailleurs, you’ll be limited in the number of gears you can use, but you’ll still be able to ride home.
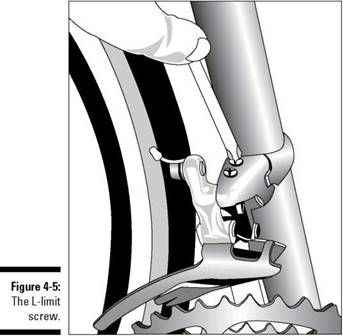
If the front derailleur cable breaks, the lack of tension will move the derail — leur to the left and position the chain on the smallest chainring. If you have a triple chainring and want to use the middle chainring, pull the derailleur over the middle chainring and tighten the L-limit screw (shown in Figure 4-5) to keep it in place. For more details on adjusting the front derailleur, refer to Chapter 14.
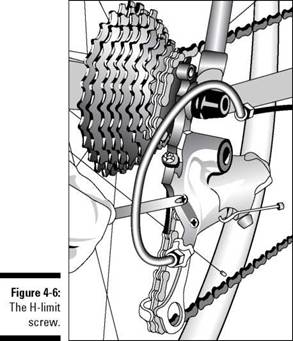
In the case of a rear derailleur cable break, the derailleur will move the chain to the smallest cog on the cassette. If you’re comfortable riding in this gear, you can finish your ride. However, if you need a more appropriate gear, you’ll need to adjust the rear derailleur. Keep in mind that there is only a limited amount of adjustments with this method and you might only be able to use one of the three smallest cogs. To make the adjustment, follow these three steps:
1. Place the chain on one of the larger cogs.
2. Use your hand to push in on the rear derailleur.
3. Tighten the H-limit screw (shown in Figure 4-6) to keep the derailleur in place.
Keep in mind that you may have to fine-tune the position of the derail — leur so that the chain runs smoothly.
|
|
|
|


