Ready to Roll!
At this point, you should have a patched or replaced tube, a tire free of debris, and the enthusiasm of knowing that this pit stop is just about over. After you finish the final steps of putting the tire and tube back on the wheel, inflating the tube, and the attaching the wheel to the bike, you’re ready to roll! We cover these final steps in this section.
Putting on the tube and tire
To reinstall the tube and the tire on the wheel, follow these steps:
1. Position the wheel with the valve hole facing upward.
2. Pull back the tire and insert the valve of the tube, partially inflated (enough to give it its shape), into the hole.
3. Working your way around the tire, tuck the tube up into the tire and on the rim being careful not to twist it.
4. Pinch together the sides of the tire in order to lift the other half of the tire bead onto the rim.
Try to use your hands to put the tire on the rim. Using the tire levers could re-puncture the tube you just worked so hard to repair or replace.
When you finish this step half of the tire should be pushed over the rim.
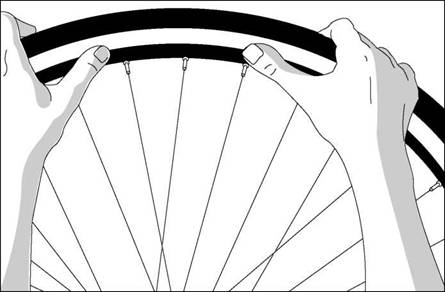
5. Start with the valve in the bottom, or 6 o’clock position, and begin working your hands away from each other around the wheel and pushing down on the bead with your thumbs or other fingers.
6. When your hands get closer together at the top, or the 12 o’clock position, squeeze with as much force as you can muster.
|
|
|
Figure 6-6: Putting the tire back on the rim.
|
You should be able to pop the final portion of the bead into place (as shown in Figure 6-6).
Sometimes the tire is very tight when you get near the top. If this happens, you need to let all the air back out of the tube and start again with your hands at the bottom, or 6 o’clock position, making sure the tire is seated down inside the lip of the rim. Pull the last section of tread with your palms. Rotate the wheel and, from the back, use both hands to pull up repeatedly until the bead snaps in.
If you must use a tire lever for the last step, be careful not to pinch the tube against the rim, or you could be back to square one. Either way, it’s time to put a smile on your face. You’re almost finished and everything is downhill from here.
Inspect the tire to make sure that the tube is not sticking out from under it.
As a precautionary step, push the valve up into the tire to make sure that the part of the tube surrounding the value is not pinned against the rim and then pull it back down to inflate. If everything looks good, begin to inflate the tube according to the pounds per square inch (PSI) rating, marked on the sidewall of the tire. As you pump it up, examine the tire to make sure the tube is
expanding consistently within the tire and isn’t bulging in any areas. If the tube isn’t expanding consistently or is bulging, the tube may be twisted or pinched by the tire and need to be reinstalled.
Attaching the wheel
To attach the wheel, follow these simple steps:
1. Confirm that the brakes have been released and there is space for the wheel to pass between them.
2. If you’re attaching the front wheel, position the wheel hub within the frame’s fork and slide it into place.
If you have a quick-release hub, the quick release will be loose in the open position. It starts to get snug when the lever is pointed straight out away from the bicycle, and very tight when pivoted into the closed position. You can adjust the tension for the closed position with the hand — turn nut on the opposite end of the quick-release skewer.
|
ДНЄ/ |
|
|
Never use the lever as a wing nut and crank it to tighten the quick release. Doing so won’t result in sufficient force to hold the wheel to the fork. The lever must be closed for the cam mechanism to securely clamp down on the fork.
If you don’t have a quick release, begin by tightening the axle nuts on both sides of the hub a little at a time until both are securely in place.
3. If you’re attaching the rear wheel, make sure the right-hand shifter is placed into the highest gear, the gear that moves the chain farthest away from the bike and onto the smallest cog.
4. Maneuver the wheel into place so that the top part of the chain just above the derailleur falls onto the smallest sprocket.
To facilitate this step, push the derailleur arm down and pull the cogs in between the loop.
5. With the chain sitting on the smallest cog (which is the cog it was on when you removed the wheel), slide the wheel into place into the rear dropout part of the frame.
6. Use the instructions in Step 2 to fasten the quick release or the axle nuts.
Congratulations! Your tire and tube should be in good shape and your flat tire a soon-to-be distant memory. After doing this a few times, you’ll find that fixing a flat will be little more than a five — to ten-minute pit stop that will barely give your riding partner time to return from a restroom break.


