Removing the tire or at least half of it
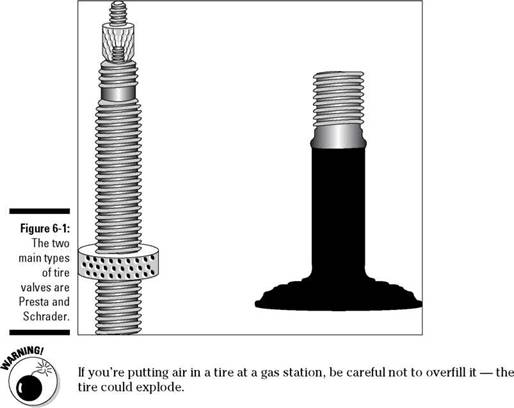
The tire is easier to remove if you release any remaining air from the tube. You release the air from the tube through the valve. There are two main types of valves (see Figure 6-1):
✓ Presta valve: A Presta valve is thin and all metal. Many road bikes use Presta valves, which can handle greater pressure and leak less than Schrader valves.
|
|
✓ Schrader valve: The Schrader valve is fat, like what you’d see on a car tire. Schrader valves are easier to pump up than Presta valves; you can fill them up at a gas station.
Some bike pumps are designed for either Presta or Schrader valves while some are reversible and work with both. If you aren’t sure what you need, ask for help in your local bike shop.
|
If you have a Presta valve, unscrew and press down on the tip of the valve. If you have a Schrader valve, insert the tip of a tire lever into the center of the valve while squeezing the tire to allow air to escape. |
Then, using the tire levers, try to lift one side of the tire off the rim while leaving the other side in place. Here’s how:
1. Pinch the tire all the way around the rim to move the edge (or bead) of the tire away from the rim.
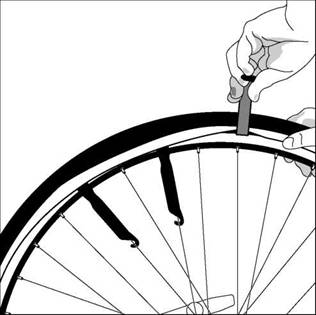
2. Slide the flat end of the first tire lever between the rim and the bead of the tire under it.
Make sure to use tire levers, not flathead screwdrivers — screwdrivers have sharp edges that can puncture the tire. In a pinch, the handles of silverware can work.
3. Pull the lever down so that the bead rises up and over the rim.
4. Hook the bottom of the lever to a spoke to keep it in place.
Some tires are very tight and you’ll need extra room, so don’t hook the first tire lever to the spoke until you get the second lever slid under the tire.
5. A few inches away, repeat steps 2 and 3 with the second tire lever.
6. Repeat steps 2 and 3 with the third lever, but instead of hooking the lever to a spoke, start dragging the lever around the wheel away from the first and second levers (as shown in Figure 6-2).
You should notice the tire becoming looser until the entire side pops off the rim.
|
|
|
Figure 6-2: Using tire levers to remove the tire. |
7. Before removing the inner tube from the wheel, pump it up with a little extra air. Later, when you have to look for the puncture, you’ll need some air in the tube and it’s easier to pump up the tube while it is still on the wheel.
8. While the tire is still on the rim, reach under it and pull out the tube.
9. When you reach the valve, lift up the tire and pull the valve through the rim, being careful not to damage it.
Note the position of the tube in relation to the tire so when you find the hole in the tube it will be easier to locate the cause (glass, a nail, a thorn), if it’s still embedded in the tire.
Finding the puncture
You’ll need to do a little detective work to find the puncture. To track down the source of the problem, follow these steps:
1. Examine the inner tube by listening for a leak.
If it doesn’t have air, pump it up to a larger shape than round. With the additional air pressure, the leak may make a hissing sound as the air tries to escape.
2. If you’re having trouble listening for the leak, float your finger above the surface of the inner tube until you feel the flow of air escaping.
|
|
If you’ve narrowed the source of the leak to a small area, but you still can’t find the actual hole, apply a small amount of saliva to the tube. Bubbles will lead you to the source.
If you don’t want to gross out your riding partners by spitting on your tube, you can sometimes find a very small hole or slow leak by holding the tube near your lips. The lips are very sensitive and should feel the smallest amounts of air leaking out.
3. If you’re still having trouble finding the leak, submerge the tube under water.
|
|
A stream of bubbles will be clearly evident after submerging the tube. When you remove the tube from the water, wrap it around your finger at the source of the leak or mark it so that you don’t lose the location.
In some cases, a hard-to-find leak may be traced to a valve problem. This is one situation in which you may want to employ the saliva technique. Apply a few drops of saliva to the end of the valve to look for signs of air escaping. For a Schrader valve, you can try tightening the valve core. If this doesn’t work, you may need to remove the core, put a few drops of oil on the spring, and reinstall the core. This technique requires a valve cap with a built-in valve core tool or a separate valve core tool, something you can buy at bike shop. If the leak is coming from a cracked or cut stem, you’ll have to replace the tube. In the case of Presta valves, more likely than a leak is the valve breaking (because valves are fragile).
Valve leaks are hard to find when the tube is outside the tire because the tube usually has very little air pressure and leaks in the valve usually only show up when there is a lot of air pressure (that is, when the tube is sitting inside the tire and the tire is inflated to the proper air pressure).


